Wednesday, 9 May 2012

Front brake caliper bracket

The time has come! One of the hardest things (if not the hardest!) to do with my project.The most dificult is dimensioning. I did lots of measurements and prepared wooden caliper bracket. See picture :)
Then I had prepared CAD technical drawing (I shrunk it a little to reduce the weight and made better shape) and sent it to my mate Patrick so that he can cut the bracket with plasma cutter.
He is a genius!!! He did his job perfectly!

So far so good! Patrick drilled the holes and tap them. Bracket will be ready soon.
Thank you Pat!!!!!


Update: 11/05/2012
Job is done :) Now its gonna to be polished and painted.


Sunday, 22 April 2012

Leaking fuel tap

After start the engine I have noticed dripping fuel directly onto the starter case :) Dangerous a little bit :)
Fuel tap leaked - so I had to fix it. I bought fuel tap repairing kit on ebay for less than 11 quid. It took 20 min. and I have brand new set of seals installed :)

Luckily I pouerd only 3 litres of fuel so there was no problem to drain it out.


Sunday, 15 April 2012

So far, so good :)

Lots of work left but as I said in the title - so far so good!!!
Bike on the wheels already! It works! Started first time! It was amazing!!!!

I have cleanded carburetors last year and make some kind of teaching film (HD quality video). Then I have copied all files from camcorder to hard drive. Unfortunately my HDD stopped working :( All data lost :( Not only carburetors video. My private holiday videos, pictures... I'm pissed off....

What is done:
wheels fitted
fuel tank fitted
radiator has been cleaned and painted. All hose clips are new
new air filter fitted - all parts removed and cleaned (pipes, air filter case etc.)
Because of different fuel tank I had to modiffied oil pipes location. All pipes and hoses are new.
cleaned carburetors. All pipes changed.

In the next posts I'll show you guys how everything was made :)

Still to do:
front brake caliper bracket
Repleace front brake piston seals
repleace fuel tap seals
make fuel tank panels and side panels
fit front headlight and indicators
mount speedo (don't know what kind of speedo yet)
mount a chain
fit rectifier to the frame

My bike now:


Friday, 1 July 2011

Fuel tank XT600E

Yes! XT600E fuel tank is going to my Tenere :) Look at the pic below - XT660 tank, without Tenere fairings and panels looks rather oddly :)


I bought fuel tank from XT600E, 2002 model. As you can see on the pic - tank is much smaller than original one :)


Looks better? YEAH!
I only put the tank on the frame to get some view :)


After lots of measurements I deceided to mount the tank.
I bought XT600 tank rubber holders. I have to fix it to the frame.


I welded bolts to metal strap and then welded it to the frame.
Immediately after frame got coolled I covered it with grey primer to prevent get it rusty.
Fuel tank holder is ready :)


Friday, 24 June 2011

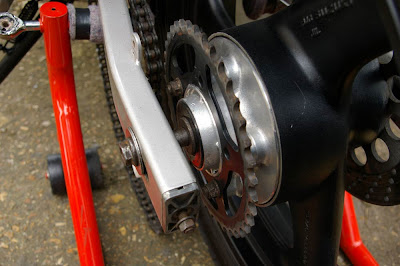
Rear wheel - sprocket and spindle/wheel spacers

OK - I have all the dimensions prepared.
As to the wheel spacers - I have some stainless steel. This is an aerospace grade of stainless. It’s extremely strong and once turned it has an excellent finish. It would make an ideal material for my wheel spacers. The downside is that it isn’t cheap :)

Sprocket spacer is going to be aluminium made. Aluminim is a good choice, as it’s easier to machine and fair strong :)

After measurement I drew a technical drawings of wheel spacers and sprocket spacer.
Wheel spacers are fairly quick to produce but sprocket spacer will take at least two hours to do that.


Sprocket spacer is ready :)


Wheel spacers are ready :)


45 teeth sprocket arrived


Everything fits excellent :)

Rear wheel - measurements

Okey-dokey then :) All measurements has been done :)
Generaly speaking, GS500 wheel looks on the old XTZ660 awesome. I can't wait when the job will done :) So far so good but few things is doubtful.

Right side.
Brake disc is too large. Original Tenere disk is quite small so I have few options:
- put smaller disc but I have'nt been able to find smaller one
- change brake caliper mounting and try to lift it and then make disc spacer on the lathe
- put completely different caliper and bracket.

I have chosen 3rd option :)


Left side:
Aluminium made sprocket carrier looks nice. I like it.
Unfortunately front and rear sprocket is out of alignment.
Inadequate alignment of the sprockets will affect wear of the chain and sprockets itselves.
Important: I have to keep front and rear wheel alignment.
Making a sprocket spacer is essential as the handling of the bike is clearly more important than wear of the chain and sprockets.
Original 39 teeth sprocket is too small. I need 45-46 teeth sprocket.
I have to match different one to existing sprocket carrier.


Friday, 17 June 2011

Rear wheel - summary

Yes! Rear wheel is gonna be on the bike as well :))) I did not forget about the most imortant bike element which is rear wheel ;-)

I bought Suzuki GS500 rear wheel in a black colour but younger a little bit :) It comes from very tidy K4 model so it is in brilliant condition. I must repleace black paint with Subaru Gold though but first I have to do a lots of measurments.

As you know guys - front wheel is quite easy to fit. The main rule: MUST BE in the middle of forks. Thats it! Two spacers and job is done. Of course we have to prepare proper caliper bracket because of larger brake disc, different offset etc, etc but I'll do it later.

With rear wheel the thing is more complicated. I chose same 17" wheel diameter so it is easier to do measurements.

The most important thing is: wheel/chain alignment.

XTZ660 rear wheel does not lay in the middle of swingarm so I have to make new spacers on the lathe. I use Original Yamaha wheel  as a exemplar and important is to keep yamaha original design to avoid any handling problems.
Suzuki GS500 wheel hub is few cm narower so rear sprocket will be in a bad alignment to front one. I have to make proper rear sprocket spacer to align the sprockets in a straight line.

The most hardest thing to do is fit the brake disc in the caliper properly OR make some brackets/adapters to adjust the caliper to brake disc.