Friday 24 June 2011

Rear wheel - sprocket and spindle/wheel spacers

OK - I have all the dimensions prepared.
As to the wheel spacers - I have some stainless steel. This is an aerospace grade of stainless. It’s extremely strong and once turned it has an excellent finish. It would make an ideal material for my wheel spacers. The downside is that it isn’t cheap :)

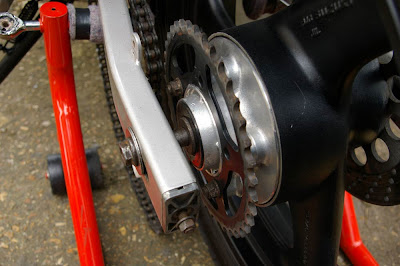
Sprocket spacer is going to be aluminium made. Aluminim is a good choice, as it’s easier to machine and fair strong :)

After measurement I drew a technical drawings of wheel spacers and sprocket spacer.
Wheel spacers are fairly quick to produce but sprocket spacer will take at least two hours to do that.


Sprocket spacer is ready :)


Wheel spacers are ready :)


45 teeth sprocket arrived


Everything fits excellent :)

Rear wheel - measurements

Okey-dokey then :) All measurements has been done :)
Generaly speaking, GS500 wheel looks on the old XTZ660 awesome. I can't wait when the job will done :) So far so good but few things is doubtful.

Right side.
Brake disc is too large. Original Tenere disk is quite small so I have few options:
- put smaller disc but I have'nt been able to find smaller one
- change brake caliper mounting and try to lift it and then make disc spacer on the lathe
- put completely different caliper and bracket.

I have chosen 3rd option :)


Left side:
Aluminium made sprocket carrier looks nice. I like it.
Unfortunately front and rear sprocket is out of alignment.
Inadequate alignment of the sprockets will affect wear of the chain and sprockets itselves.
Important: I have to keep front and rear wheel alignment.
Making a sprocket spacer is essential as the handling of the bike is clearly more important than wear of the chain and sprockets.
Original 39 teeth sprocket is too small. I need 45-46 teeth sprocket.
I have to match different one to existing sprocket carrier.


Friday 17 June 2011

Rear wheel - summary

Yes! Rear wheel is gonna be on the bike as well :))) I did not forget about the most imortant bike element which is rear wheel ;-)

I bought Suzuki GS500 rear wheel in a black colour but younger a little bit :) It comes from very tidy K4 model so it is in brilliant condition. I must repleace black paint with Subaru Gold though but first I have to do a lots of measurments.

As you know guys - front wheel is quite easy to fit. The main rule: MUST BE in the middle of forks. Thats it! Two spacers and job is done. Of course we have to prepare proper caliper bracket because of larger brake disc, different offset etc, etc but I'll do it later.

With rear wheel the thing is more complicated. I chose same 17" wheel diameter so it is easier to do measurements.

The most important thing is: wheel/chain alignment.

XTZ660 rear wheel does not lay in the middle of swingarm so I have to make new spacers on the lathe. I use Original Yamaha wheel  as a exemplar and important is to keep yamaha original design to avoid any handling problems.
Suzuki GS500 wheel hub is few cm narower so rear sprocket will be in a bad alignment to front one. I have to make proper rear sprocket spacer to align the sprockets in a straight line.

The most hardest thing to do is fit the brake disc in the caliper properly OR make some brackets/adapters to adjust the caliper to brake disc.

Thursday 16 June 2011

New parts have arrived

Yeah! Brand new "bandit look" headlights arrived :) I like it! Fully road legal with nice chromed brackets.


New fork gaiters arrived as well. Nice rubber quality and good price :)


I bought new handlebars end weights. Old ones were sratched and one was missing. So I decided to buy "bullet" alloy weights. Not to heavy but should rise to the occasion ;-)


Wednesday 15 June 2011

Front wheel - my "brand new" alloy

Wow! It looks awesome :) I can't wait when I'll see the wheel on her :) Yeah!
Mark has done great job :) Belive me guys - it looks better than original new one :)
All signs are grind out except rim dimensions and "made in japan" :)


Front end: triple clamps and handlebar painting

I removed old paint from triple clamps and handlebar. Then I polished it and painted.
Handlebar holders are aluminium made so I decided to polish it and left unpainted.
I used 5 sand paper grades - 120, 240, 400, 600 and 1500.


Painted handlebar - primer + paint + laquer clear. Looks like new :)


Painted triple clamps.
New washer and Koyo bearing is going to be installed.


Painted upper triple clamp + polished handlebars holders.

Front end: bearings and races removing

Steereng stem lower bearing is hard to remove.
I smashed old lower bearing with screwdriver. Then I cut the race in two places with Dremel tool. You have to be careful - stem should be untouched!


Then using the hammer and drift punch I carefuly removed the race.


I removed bearing races with hammer and long drift punch.
Race wear is easy noticeable.

Front end: summary

The front end tappered bearings are in a bad condition. I'm going to repleace them :)

What do I have:
Dirty, rusted front end with already painted fork tubes.
Untidy triple clamps and handlebar
Damaged steering bearings and races

Goal:
• Repleace old steering stem bearings and races
• polish and paint triple clamps
• polish alloy handlebar clamps
• polish and paint handlebar
• put new handlebar end weights
• put new yellow fork gaiters

Sunday 12 June 2011

Front Wheel - measurements + spacers

I bought an alloy Suzuki GS500 wheel . 17" and 3" wide.
REAL supermoto wheels are often very expensive and choosing the right one can be not easy :)
Supermoto bike for street use, should has a front rim 17" x 3.5. alloy rim - professionally drilled and specified for supermoto + spokes. I chose solid alloy wheel because I like it and the price is many times lower than real SM wheels. Thats it :)
Wheel has came :) It is dirty, has small chips and scratches. It is going to be cleaned, polished (I'll remove all numbers and Suzuki logo). Then my friend Mark will paint it to Subaru Gold colour.
But first of all I have to do lots of measurements to fit it XT660 forks :)

What do I have:
Dirty, untidy Suzuki GS500 front wheel
Avon tyre is in decent condition and Koyo bearings are fine

Goal:
Remove signs and Suzuki logo.
Clean and polish then paint to Subaru Gold
Put the brake disk to the left side of the wheel
Do measurements to fit XT660 forks
Mill some spacers to centre the wheel. Material: sainless steel
Remove speedo drive - spacer + seal instead
Measurements:
Wheels fit accuracy should be done carefully. Front wheel has to be exactly in the middle between forks so I have to measure it then mill some spacers. I used old XTZ spindle - fits perfect.

After measurements I prepared technical drawing of spacers.
I want to remove speedo drive permanently so I have to mill spacer with collar and then put some seal to prevent coming dust into a bearing.
I turned two spacers: left with colar and to the right side I used old Suzuki GS500 spacer with collar and cut it few millimeters.


Problem 1:
The tyre is exactly to the level of forks brace bolts so I can't put the fender here... I have to do something with it... but later :)


Problem 2:
Theres no enough space for caliper bracket. Is to close to brake disc.
I already have a solution. I'll let you know later :)


Friday 10 June 2011

Front forks painting

At first sight I realised that the main thing is to paint some parts of the bike.

Forks are dirty and has lot of scratches. Brake disk cover holder is broken. I have to cut and grind it.
Forks was on a bike. I removed an old paint with Nitro Mors Paint & Varnish Remover bought in Halfords for £6.79. It did its job perfectly!
Then I used a 240 grid sand paper. Next was 400 and last one was 800. Surface was smooth and shiny. It is aluminium and I know that I should not paint it with ferrous metal paint but I did it.
2 coats of grey primer, 2 coats of Nissan Silver paint and 2 coats of clear laquer to finish it :)
Look at the difference!!!!


Let's start!!!!

As my friend was moving to New Zeland he gave me his 1997 XTZ660 Tenere as a gift :)


So... I deceided to put some life into her. I was considered to restore and bring her back to original condition. I painted the front fairing, petrol tank, front fender, side panels to yellow Fiat color.

I cleaned the bike, fixed her (she is alive!) and... IT IS STILL XTZ660 Tenere... Probably real ADV riders could be delighted but I was not...


I changed my mind... YES! I want to transform her to some kind of heavy supermoto bike :)
Therefore, the idea is to create a unique bike but nothing very special.


What do I have:
Untidy 1997 Yamaha XTZ660 Tenere. Some parts needs to be rebuilt some cleaned etc..

Goal:
- clean up and paint the frame
- do major engine service
- supermoto, alloy wheels
- XT600 petrol tank
- better brakes - front and rear
- different front look: bandit headlights
- different indicators
- Koso XR-SR digital gauges or similar
- Suzuki GSXR1000 exhaust can
etc etc etc etc etc.....

Generally its gonna be Yamaha XTZ660 Tenere mixed with Yamaha XT600E, Yamaha XT660X Supermoto, Suzuki GS500, GSXR1000 and...
...it has begun!!!


Sunday 5 June 2011

Why Tenere? How about a supermoto?

I always liked doing something with my bikes.
It was in 1985 when I got my first serious bicycle - I was 10 years old... 2 weeks later my brand new bike had a shock absorbers installed. My mom was terrified! YES! I did it myself!  I was so proud of my job and 20 years later I hit on an idea to change my 1997 Tenere :)